The Log Furniture Care Bible: Maintenance, Restoration, and Repair
Wood is alive. Even fifty years after it was cut, peeled, and crafted into a bed or a swing, your log furniture breathes, moves, and reacts to its environment. This is part of its charm, but it also creates a responsibility for the owner. Log furniture maintenance is not just about cleaning; it is about understanding the physics of the wood and knowing how to protect it from its three natural enemies: sun, moisture, and neglect.
Most information on this topic is scattered across the internet—a cleaning tip here, a varnish recommendation there. This creates confusion and often leads to well-intentioned owners using the wrong products that actually accelerate decay. This guide changes that.
We have compiled the complete “Care Bible,” a single, definitive resource for indoor and outdoor log furniture. We will cover the chemistry of finishes, the biology of pests, and the physics of “checking.” Whether you are trying to silence a squeaky bed, fill a crack in a dining table, or resurrect a grey, weathered patio set, the answers are here.
Quick Navigation
- The Science of the “Living” Log: Why Wood Moves
- Indoor Care: Dust, Sun, and Humidity
- The “Check” Doctor: Handling Cracks & Fissures
- Outdoor Restoration: The 4-Step Resurrection Protocol
- The Finish Lab: Penetrating Oils vs. Film Finishes
- Pest Defense: Beetles, Bees, and Borates
- Log Furniture Maintenance FAQ
The Science of the “Living” Log: Why Wood Moves
Before you pick up a sandpaper block or a stain brush, you must understand what is happening inside the log. The root cause of almost every “issue”—from cracks to squeaks—is a concept called Equilibrium Moisture Content (EMC).
Wood is hygroscopic. This means it acts like a sponge, constantly exchanging moisture with the air to match the humidity of its environment. It is always seeking balance.
- In Summer (High Humidity): The air is wet. The wood absorbs this moisture and swells across the grain.
- In Winter (Low Humidity/Dry Heat): The air is dry (especially with central heating). The wood releases its moisture back into the air and shrinks.
This constant cycle of expansion and contraction puts immense stress on the wood fibers. When the outer layers of a log dry faster than the center, the tension releases in the form of a crack, known in the industry as a “check.” This is not a defect; it is physics at work. Successful log furniture care is simply the art of managing this moisture exchange to keep the wood as stable as possible.
The Acclimatization Rule
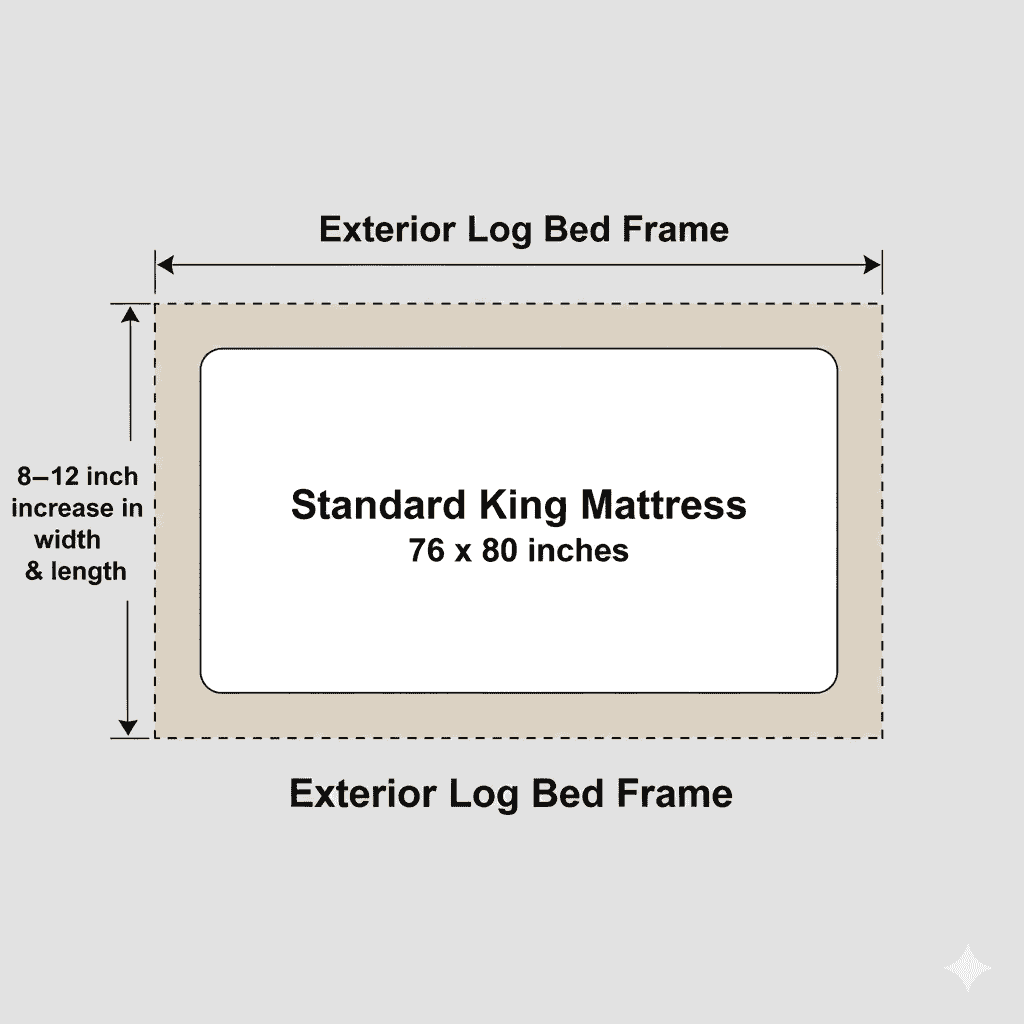
Because of EMC, you should never assemble a new piece of log furniture immediately after it arrives, especially if it traveled from a different climate (e.g., shipping from humid Michigan to dry Arizona).
Pro Tip: Let the wood sit in the room where it will live for 48-72 hours before tightening the bolts. This allows the wood to “exhale” or “inhale” and adjust to your home’s specific humidity level, preventing warping or immediate squeaking after assembly.
Indoor Care: Dust, Sun, and Humidity
Indoor log furniture lives in a relatively protected environment, but it is not immune to damage. The goal here is preservation: keeping the finish intact and the wood stable.
Identifying Your Finish
You cannot care for a finish if you don’t know what it is. Most indoor log furniture is sealed with Lacquer or Polyurethane.
The Test: Pick a hidden spot. Rub a cotton swab dipped in nail polish remover (acetone) on the finish.
1. If the finish softens or becomes tacky, it is Lacquer (common on high-end furniture).
2. If it does nothing, it is likely Polyurethane or Varnish (extremely durable).
3. If it smears but doesn’t dissolve, it may be a Wax finish.
The Dusting Rule: Avoid Silicone
Your first instinct might be to grab a can of commercial spray polish (like Pledge). Don’t. Many commercial polishes contain silicones. While they create a temporary shine, silicone eventually builds up on the surface, creating a hazy film that attracts more dust.
Worse, silicone is chemically stubborn. If you ever need to refinish the piece in 10 years, the silicone residue will create “fish eyes” (craters) in the new finish, making restoration nearly impossible.
The Solution: Use a slightly damp microfiber cloth for regular dusting. For a deeper clean, use a wood soap (like Murphy’s Oil Soap) diluted in warm water. Wipe dry immediately. If you want a sheen, use a high-quality beeswax paste, which feeds the wood without creating a chemical barrier.
Sunlight: The Silent Fader
UV rays are aggressive. If your log bed or dining table sits directly in front of a south-facing window, the finish will degrade, and the wood will bleach or yellow over time.
The Fix: Rotate your furniture occasionally if possible. If not, consider applying a window film that blocks UV rays or using blinds during the peak sun hours of the day.
Scratch Repair Hacks
For minor surface scratches that haven’t penetrated deep into the wood:
- The Walnut Trick: Take the meat of a raw walnut and rub it diagonally over the scratch. The natural oils in the nut will darken the scratch and blend it in.
- Wax Sticks: For deeper gouges, use a colored wax fill stick (available at any hardware store) that matches your stain color. Rub it in, then buff off the excess with a credit card.
The “Check” Doctor: Handling Cracks & Fissures
The most common question in log furniture maintenance is: “My log has a giant crack in it. Is it breaking?”
The answer is almost always no. Checks generally stop at the center (heart) of the log and do not compromise structural integrity. However, they can be unsightly or annoying.
To Fill or Not to Fill?
Not all checks are created equal. You need to decide if the repair is functional or cosmetic.
- Horizontal Surfaces (Dining Tables, Desks): YES. You should fill checks on flat surfaces because they become traps for crumbs, liquids, and bacteria. A spilled glass of milk inside a log check is a smell you never want to experience.
- Vertical Surfaces (Bed Posts, Legs): OPTIONAL. On vertical logs, checks are purely cosmetic. Many owners leave them as a badge of rustic authenticity. However, if the check is very wide, you may want to fill it to prevent dust accumulation.
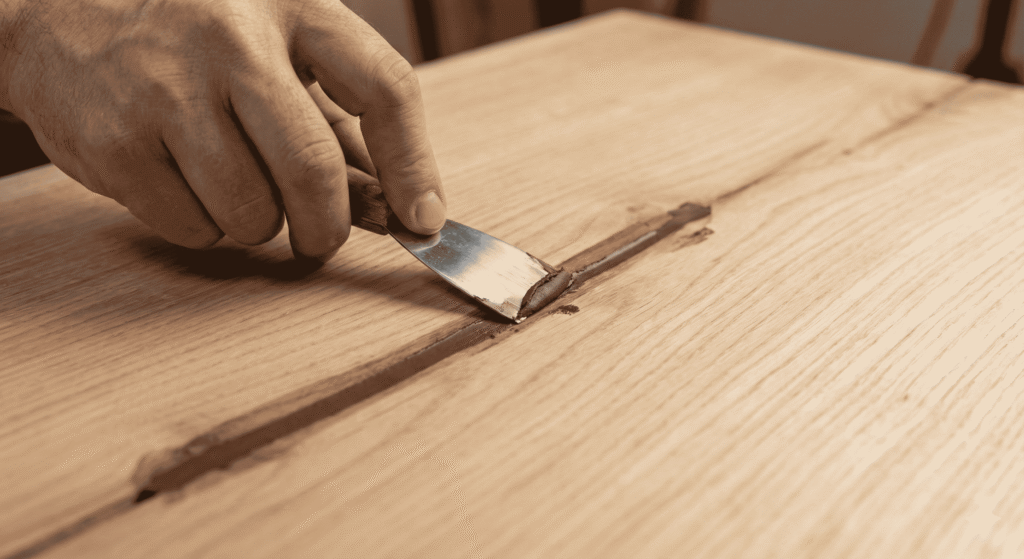
How to Fill Checks Correctly
The biggest mistake owners make is using standard “wood putty” that dries hard and brittle. As the log continues to move (remember the science!), brittle putty will crack and fall out. You need a flexible or permanent solution.
- Epoxy (The Permanent Solution): For table tops, use a clear two-part epoxy. You can mix it with sawdust or coffee grounds to color-match the knot. This bonds permanently to the wood and creates a smooth, glass-like seal that stabilizes the crack.
- Flexible Caulk (The Easy Solution): For painted or solid-stain logs, use a high-quality, flexible acrylic latex caulk (colored to match). This will stretch and compress as the log moves.
- Sawdust & Glue (The Craftsman’s Hack): Mix fine sawdust from the same wood species with standard wood glue to create a thick paste. Press it into the crack and sand smooth once dry. This accepts stain better than most commercial fillers.
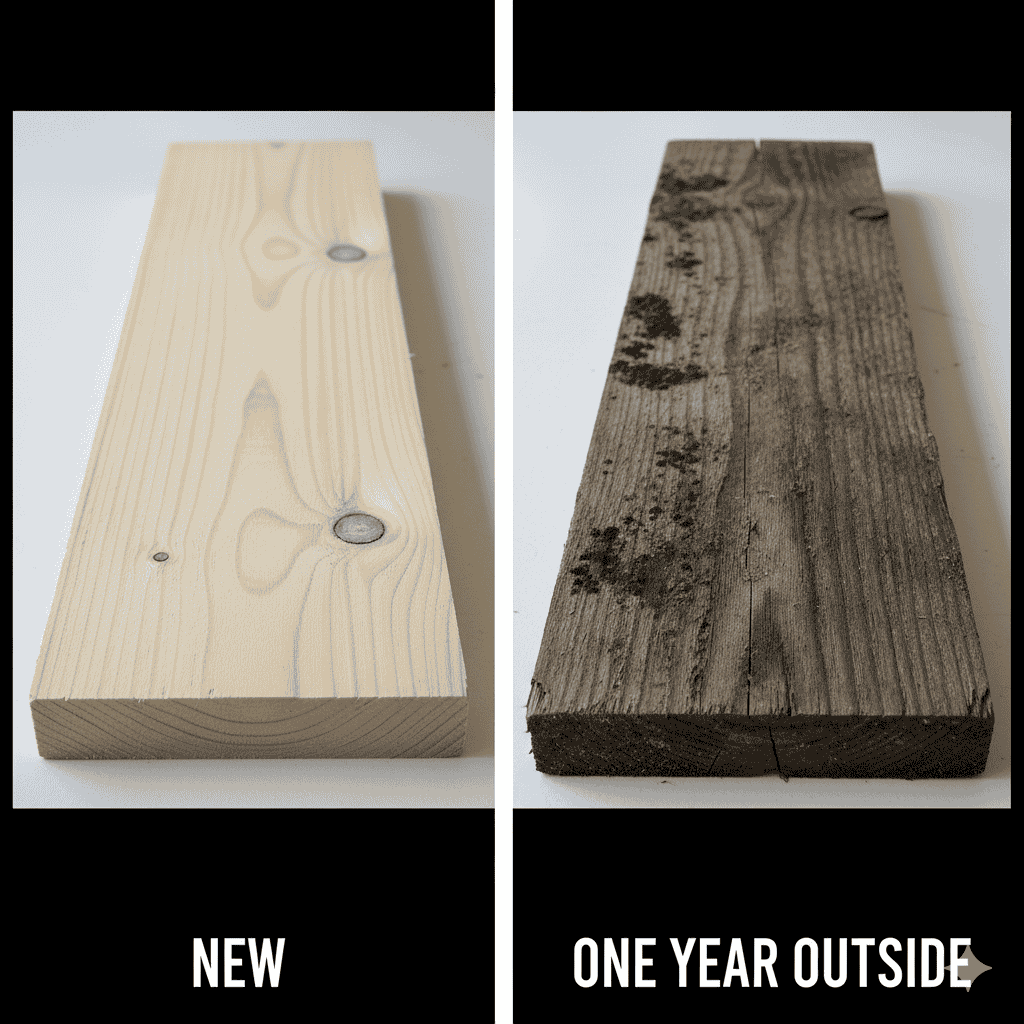
Outdoor Restoration: The 4-Step Resurrection Protocol
This is the heavy lifting. If you have a log swing, a porch rocker, or a patio set that has turned grey, grown mold, or started to peel, do not throw it away. Log furniture is incredibly resilient. Unless the rot has penetrated deep into the core, you can bring it back to life.
Follow this 4-step log furniture restoration protocol to turn a weathered relic back into a golden showpiece.
Step 1: The Deep Clean
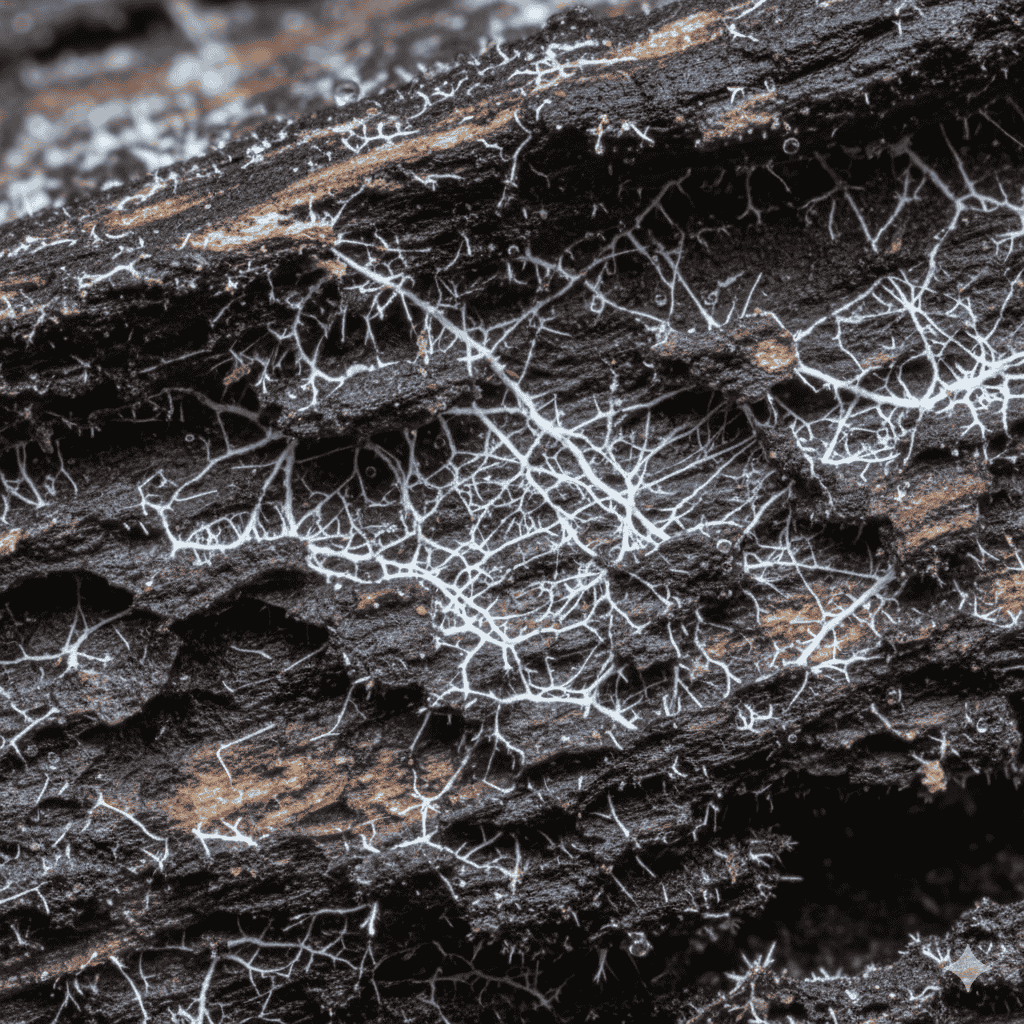
You cannot sand or stain dirty wood. You must first remove the surface dirt, pollen, and most importantly, kill the mildew spores living in the wood fibers.
The Magic Mix: Avoid harsh chlorine bleach (like Clorox), which breaks down the wood’s lignin (the natural glue holding fibers together) and leaves the surface “fuzzy.” Instead, use this formula:
Combine 1 gallon of warm water, 1 cup of powdered Oxygen Bleach (sodium percarbonate, like OxiClean), and a squirt of dish soap (surfactant to help it stick).
The Method:
1. Wet the logs with a garden hose.
2. Apply the mix and let it sit for 10 minutes (keep it wet).
3. Scrub vigorously with a stiff-bristle nylon brush. Never use a metal wire brush; metal shards can break off, embed in the wood, and rust later, creating permanent black spots.
4. Rinse thoroughly.
Warning: Be extremely careful with pressure washers. Softwoods like Cedar and Pine can be easily gouged by high-pressure water. If you must use one, keep it below 1500 PSI and hold the wand at least 12 inches from the wood.
Step 2: The Brightener (Oxalic Acid)
After cleaning, the wood may still look dark, stained, or uneven. This is often due to tannin bleed or iron stains (from nails). This is where Oxalic Acid (often sold as “Wood Brightener” or “Deck Brightener”) performs magic.
Oxalic acid is a chemical that reacts with the tannins and iron to neutralize the discoloration.
The Method: Apply the brightener while the wood is still wet from cleaning. Let it sit for 10-15 minutes. You will watch the wood visibly lighten and return to its natural “blonde” or “tan” color before your eyes. Rinse thoroughly. This step is the difference between an “okay” restoration and a “professional” one.
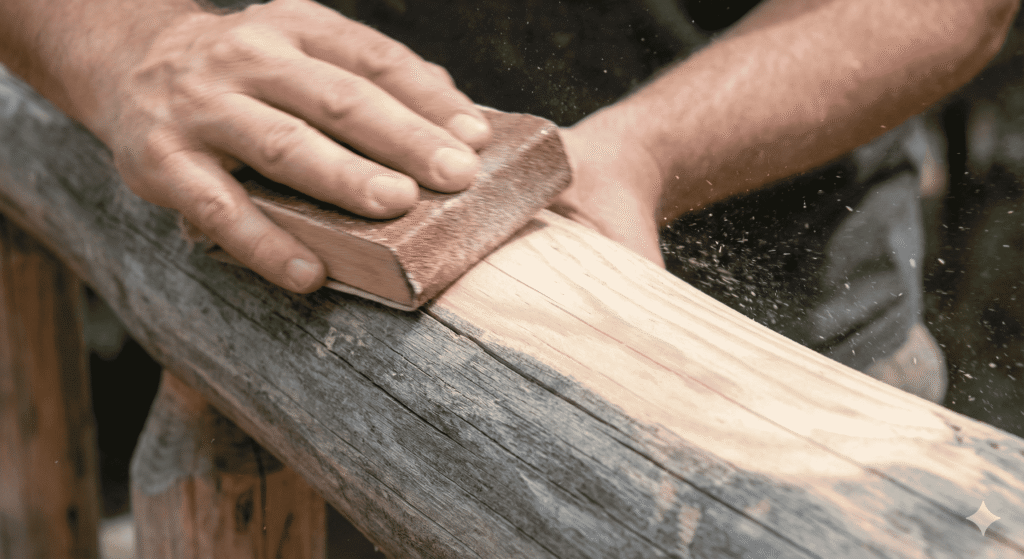
Step 3: The Sanding
Once the wood is 100% dry (wait 24-48 hours), you must sand it. The cleaning process raises the “grain” of the wood, making it feel rough.
The Grit Rule: Do not go too fine. Use 60 to 80 grit sandpaper for the first pass to remove old finish, and finish with 80 to 100 grit.
Crucial: Do not use 220 grit or higher. If you polish the wood too smooth, you close the pores. You want the wood pores open so they can drink in the new finish.
Step 4: The Finish
Now that your wood is clean, bright, open, and dry, you must seal it immediately. But which finish should you use? This choice determines your future maintenance for the next decade.
The Finish Lab: Penetrating Oils vs. Film Finishes
There is a massive debate in log furniture care between film-forming finishes and penetrating oils. To make the right choice, you need to understand the chemistry of failure.
| Feature | Film-Forming (Spar Urethane / Varnish) | Penetrating Oil (Tung / Linseed / Translucent Stain) |
|---|---|---|
| How it Works | Sits on top of the wood like a plastic sheet (armor). | Soaks into the wood fibers and hardens (saturation). |
| Appearance | High gloss or satin sheen. Looks “coated” and shiny. | Matte or low luster. Looks natural and organic. |
| The Failure Mode | Catastrophic. When UV rays eventually make it brittle, it cracks. Water gets under the film, gets trapped, and causes the finish to peel in sheets (like a sunburn). | Graceful. It simply erodes and fades away over time due to UV exposure. It does not peel. |
| Maintenance | HARD. If it peels, you cannot just paint over it. You must sand the entire piece down to bare wood to fix it. | EASY. Simply clean the wood and apply a fresh coat over the old one. No sanding required. |
| Verdict | Best for Indoor tables (protection). Risky for outdoors. | Best for Outdoor logs. Much easier long-term ownership. |
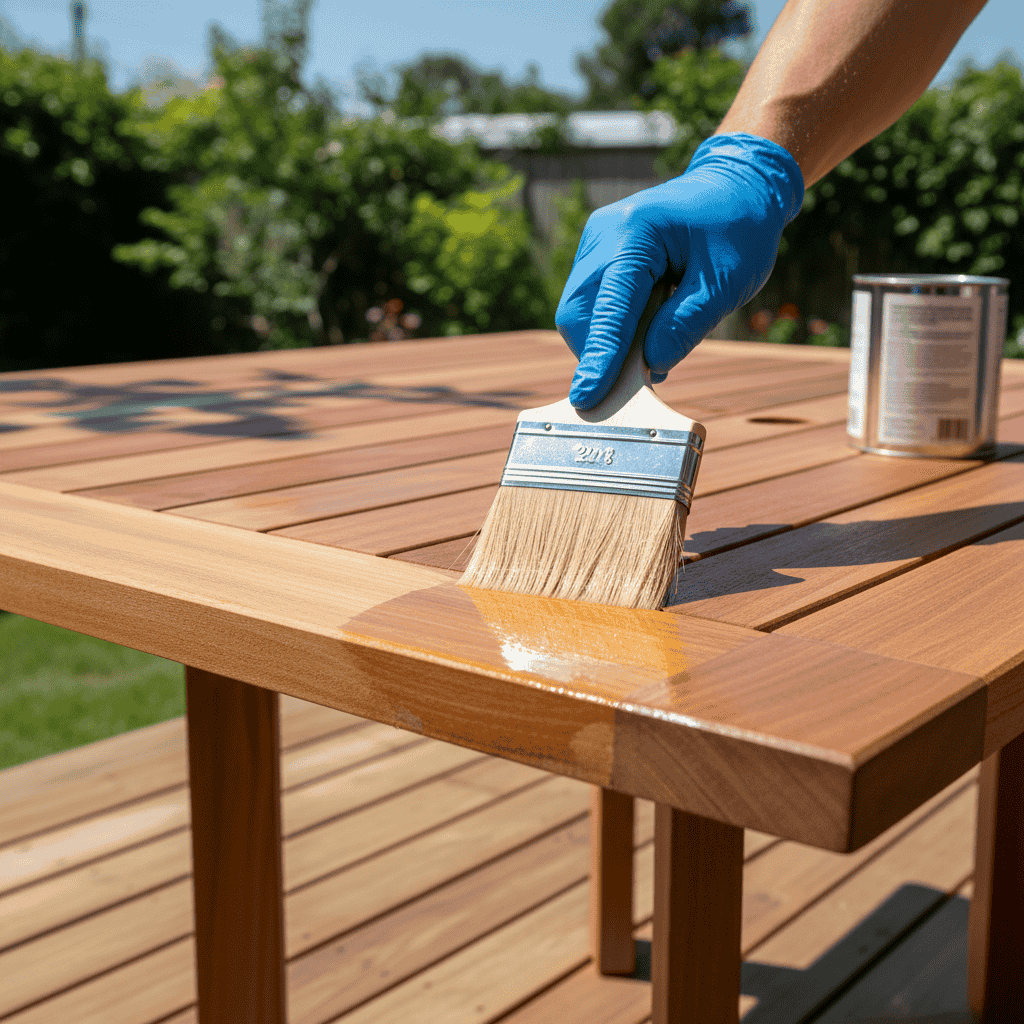
The Expert Recommendation
For outdoor log furniture, we strongly recommend using a high-quality Penetrating Oil or Translucent Stain. Why? Because you are lazy (and so are we). With an oil finish, when the wood starts to look dull in 2 years, you just wash it and brush on another coat. Done. With a varnish, if you wait too long and it peels, you are looking at a weekend of sanding.
SAFETY WARNING: If you use products containing Linseed Oil or Tung Oil, be aware of Spontaneous Combustion. Oily rags crumpled in a pile can heat up and catch fire on their own. Always lay oily rags flat to dry outdoors, or soak them in a water-filled metal container before disposal.
Pest Defense: Beetles, Bees, and Borates
Sometimes the problem isn’t the weather; it’s the wildlife. If you see small piles of sawdust (frass) under your furniture, you have visitors. Here is how to evict them.
Powderpost Beetles
Identification: Look for tiny pinholes (the size of a pencil lead) and very fine, flour-like sawdust piling up below the holes. These beetles eat the wood from the inside out.
The Fix: You need a Borate treatment (common brands: Tim-Bor or Bora-Care). These are mineral salts that are toxic to insects but safe for humans and pets. Mix the solution with water and spray it onto the raw wood (finish must be removed first for it to soak in) or use a syringe to inject it directly into the holes.
Carpenter Bees
Identification: Large, perfectly round holes, about 1/2 inch in diameter. You will often see them on the underside of railings or armrests.
The Fix: Do not just plug the hole immediately; the bee is likely inside or has laid eggs.
1. Squirt a bee killer foam or dust (like Deltamethrin) into the hole.
2. Wait 24 hours to ensure the colony is neutralized.
3. Plug the hole with a tapered wooden cork (dowel) or steel wool, and seal it with wood glue to prevent moisture entry.
Log Furniture Maintenance FAQ
Perform the “splash test.” Splash water on the arm of the chair. If it beads up, your finish is still active. If it soaks in and creates a dark spot, the wood is thirsty, and it is time to recoat. Typically, horizontal surfaces (armrests, seats) take the most abuse and need sealing every 1-2 years, while vertical surfaces (legs, backs) can go 3-5 years.
We advise against using standard chlorine bleach. It attacks the structural integrity of the wood fibers, making them brittle and fuzzy. Always use an Oxygen Bleach (sodium percarbonate) cleaner. It is just as effective at killing mold roots but is gentle on the wood structure.
Squeaks are caused by friction between two pieces of wood rubbing together. This usually happens in winter when the wood shrinks (low humidity). To fix it:
1. Tighten: Use a socket wrench to tighten all lag bolts.
2. Lubricate: Disassemble the joint and apply beeswax or paraffin wax to the mortise-and-tenon connection.
3. Pad: Place small felt pads between the mattress slats and the side rails.
If the ring is white, the moisture is trapped in the finish, not the wood. Place a clean, dry cotton cloth over the ring and run a clothes iron (set to low heat, no steam) over it for a few seconds. The heat will draw the moisture out of the finish and into the cloth. If the ring is black, the water has penetrated the wood, and you may need to sand and bleach that spot with oxalic acid.
Continue Your Rustic Design Journey
Now that you know how to care for it, explore the best wood types to buy: